Efficient Radon System Installation: Protecting Your Home and Business
- candyellestad
- Feb 18
- 3 min read
Radon is a silent threat that can affect any building, whether a home or a business. This naturally occurring radioactive gas is colorless, odorless, and tasteless, making it impossible to detect without proper testing. If left unchecked, radon exposure can lead to serious health risks, including lung cancer. That is why efficient radon system installation is crucial for safety and peace of mind.
In this post, I will walk you through the key steps and best practices for installing radon mitigation systems effectively. Whether you are a homeowner or a business owner in Minnesota, understanding this process will help you make informed decisions and ensure your property remains safe.
Understanding Radon and Its Risks
Radon forms when uranium in soil, rock, and water breaks down naturally. It can seep into buildings through cracks in foundations, gaps around pipes, and other openings. Because it accumulates indoors, radon levels can become dangerously high without proper ventilation.
The Environmental Protection Agency (EPA) recommends action if radon levels exceed 4 picocuries per liter (pCi/L). Testing is the only way to know your radon levels. Once high levels are confirmed, installing a radon mitigation system is the most effective way to reduce radon concentrations.
Radon exposure is the second leading cause of lung cancer after smoking. This fact alone underscores the importance of addressing radon issues promptly and efficiently.
Key Steps in Radon System Installation
Installing a radon mitigation system involves several important steps. Each step must be done carefully to ensure the system works effectively and lasts for years.
1. Radon Testing and Assessment
Before installation, a thorough radon test is essential. This usually involves placing radon detectors in the lowest livable area of the building for a few days to a week. The results will guide the type of mitigation system needed.
2. Choosing the Right System
There are different types of radon mitigation systems, but the most common is the sub-slab depressurization system. This system uses a vent pipe and fan to draw radon from beneath the building and release it safely outside.
Other options include:
Drain-tile suction
Block-wall suction
Crawl space ventilation
The choice depends on the building’s construction and radon levels.
3. Sealing Entry Points
Sealing cracks and openings in the foundation is a critical part of the installation. This step helps prevent radon from entering and improves the system’s efficiency.
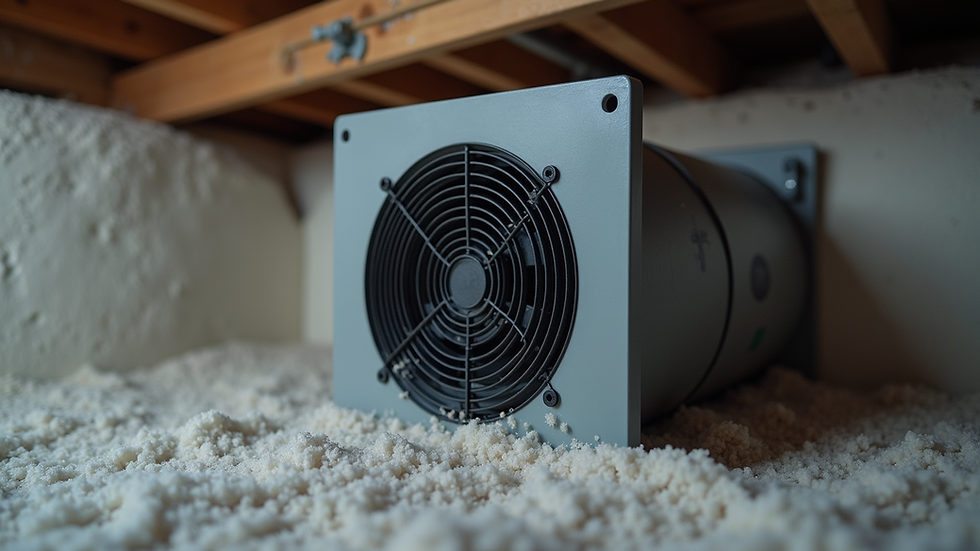
4. Installing the Vent Pipe and Fan
A vent pipe is installed through the foundation slab or basement floor. The pipe runs vertically to the roof, where a fan continuously pulls radon gas from beneath the building and vents it outside.
5. System Testing and Monitoring
After installation, the system must be tested to confirm it is reducing radon levels effectively. Continuous monitoring ensures the system remains functional over time.
Tips for Efficient Radon System Installation
Efficiency in radon system installation means doing the job right the first time, minimizing disruption, and ensuring long-term effectiveness. Here are some practical tips:
Hire Certified Professionals: Look for certified radon mitigators who follow EPA guidelines and local regulations.
Plan for Accessibility: Install components where they can be easily accessed for maintenance.
Use Quality Materials: Durable pipes, fans, and sealants ensure the system lasts longer.
Communicate Clearly: Understand the installation process and ask questions to avoid surprises.
Schedule Post-Installation Testing: Confirm the system’s performance with follow-up radon tests.
These steps help avoid common pitfalls like improper sealing or fan placement, which can reduce system effectiveness.
Why Timely Installation Matters
Radon levels can fluctuate with weather, seasons, and building use. Delaying installation after a high radon test result increases exposure risk. Prompt installation reduces radon quickly and protects everyone inside.
Additionally, early mitigation can prevent costly repairs later. Radon can cause structural damage over time by affecting concrete and other materials. Efficient installation also adds value to your property by demonstrating a commitment to safety.
Maintaining Your Radon Mitigation System
Once installed, your radon system needs regular maintenance to keep working well. Here are some maintenance tips:
Check the Fan: Listen for unusual noises and ensure it runs continuously.
Inspect the Vent Pipe: Look for cracks or damage.
Monitor Radon Levels: Test annually or after major renovations.
Replace Components as Needed: Fans typically last 5-10 years.
Proper maintenance ensures your investment continues to protect your home or business.
Taking the Next Step for Safety
If you suspect radon in your building or have received high test results, don’t wait. Efficient mitigation system installation is the key to reducing radon levels and protecting health.
Advanced Radon Solutions specializes in radon testing and mitigation in Minnesota. Their experienced team uses proven methods to install systems that work effectively and last. By choosing trusted professionals, you ensure your property is safe and compliant with local standards.
Radon may be invisible, but the risks are real. Taking action today means a safer tomorrow for everyone who lives or works in your building.


Comments